Post by DaHeill on Oct 10, 2016 21:30:08 GMT
(IF BEGINNER, YOU DON'T NEED TO READ THE FOLLOWING)
So first of all I should say that this tutorial won't be for people that know the basics of pivot, or sorta know them, you gotta know the buttons after all
I will be explaining how to make a stk as much I can go in detail.
If you already know how to make sticks and want to know how to detail or something this is not the tutorial for you.
So I made this tutorial for the people who quite don't understand stk making, because in my begining I didn't understand most of it, so why not explain it to the people who are as stupid as me xD? (jk)
(THIS IS THE TUTORIAL)
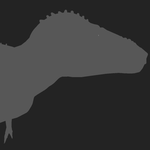
1.Template
First of all you need a template to work on (Preferably a skeletal reconstruction such as this one:

This one will probably be a bad example because you need your template to be in a colour that doesn't include : BLACK , BLUE
The reason is because the stick creature uses Black as a colour for your figure(You see it in black) and Blue for the current selected part(The part of the figure you selected)
So it will be better if it contrasts with BLUE
2.Sprite images and transparency
A sprite image (in pivot) is a image that can be created in a program such as Paint,Photoshop,Gimp or something else, and then loaded into pivot, it also needs to be Png, because this is the only type of pictures that pivot accepts
First of all you need it as less blurry as possible because if it blurry it seems quite off in pivot, creating glitches by making the transperent part filled
To open a sprite image in pivot you do this:
1.Open pivot
2.Click File(in the top left), then click load SpriteImage
3.Select the picture you want(Must be .png)
4.Click Open
So you loaded your template, now you must position it and set it's size
If the size seems ok to you you can just position it, using the orange dot on the left corner of the picture
Position it to make it fit your screen, so you can see it better
To resize a picture use this menu:

When you resized it and set it on your screen so it is in the perfect position and size, we start learning about the transparency!
The transparency is quite easy to use in the Stick creator!
But first, to open the stick creator do the following:
1.Click File
2.Click Create Figure Type
3. Now make it on full screen
To be able to see your template you need to do the following
1.Make sure it's set correctly
2.Use the key > to make it less transparent and the key < to make it more transparent
That's pretty much it!
3.Creating the "skeleton" of the figure
The skeleton of the figure is it's actually movable part, the lines that will make it smoother will not be visible and able to move
First of all you should see a line that is the very base of the stk, to make it bigger use the arrow keys (^,| )
( | V )
You should know that the more part of the body one line like this covers is better if more, here's an example:
Sorry for the bad template :/

Now pressing the letter L for simple, complete the skeleton by connecting the parts
Keep in mind that a general part of the body should be made on it's own, don't make the whole dinosaur in once.
In my case one of the general groups is it's - Body, Tail, Head of the Therizinosaurus
The end result may look something like this

Now for a bit more complicated part - The head and the mouth
So this simply can't be explained, my method of doing this is making 4 handles for the mouth, you should however make them static by pressing S on your keyboard, they will now look greyish:

In green are the parts that should be static and in blue are the ones that should be dynamic
4.Making the stick smooth (Not looking like made of balls of toilet paper)
So now you don't want it to look like made of circle lego right? Here's how to do it
First: there's a thing you should remember - In this stage always press S after making a part(Line)!!!
Now to make it look smooth you need to cover every part of the skeleton's edges with lines so it looks like the creature's actual body
Remember not to continue one line for the whole General group (the part of the stk you are making), A part of the skeleton's "flesh" should only be on it's place, don't make the detail for the tail straight to the head.
Test if it's flexible enough(No edges show up when you move the skeleton)
( Sobcrib Plox ;( )
Now for the head and mouth whic i suppose is harder for some people
Cover the dynamic handles with static lines and with this method cover the whole upper or lower jaw, do the same for the other jaw, it is preferable to make the upper jaw static, the figure won't move realisticly if you move it's upper jaw. There are exceptions ofcourse such as mosaurus or any snake i guess.

Ofc the stick I am making won't be perfect because it's an example HOW TO DO IT, NOT how to MAKE IT PERFECT
Quick note:
I wont make the tutorial on how to do the legs and arms because it's just like this
1.Add base(Skeleton)
2.Add smoothing parts(Flesh)
3.Test
This is it, hope I helped I guess
So first of all I should say that this tutorial won't be for people that know the basics of pivot, or sorta know them, you gotta know the buttons after all
I will be explaining how to make a stk as much I can go in detail.
If you already know how to make sticks and want to know how to detail or something this is not the tutorial for you.
So I made this tutorial for the people who quite don't understand stk making, because in my begining I didn't understand most of it, so why not explain it to the people who are as stupid as me xD? (jk)
(THIS IS THE TUTORIAL)
1.Template
First of all you need a template to work on (Preferably a skeletal reconstruction such as this one:
This one will probably be a bad example because you need your template to be in a colour that doesn't include : BLACK , BLUE
The reason is because the stick creature uses Black as a colour for your figure(You see it in black) and Blue for the current selected part(The part of the figure you selected)
So it will be better if it contrasts with BLUE
2.Sprite images and transparency
A sprite image (in pivot) is a image that can be created in a program such as Paint,Photoshop,Gimp or something else, and then loaded into pivot, it also needs to be Png, because this is the only type of pictures that pivot accepts
First of all you need it as less blurry as possible because if it blurry it seems quite off in pivot, creating glitches by making the transperent part filled
To open a sprite image in pivot you do this:
1.Open pivot
2.Click File(in the top left), then click load SpriteImage
3.Select the picture you want(Must be .png)
4.Click Open
So you loaded your template, now you must position it and set it's size
If the size seems ok to you you can just position it, using the orange dot on the left corner of the picture
Position it to make it fit your screen, so you can see it better
To resize a picture use this menu:
When you resized it and set it on your screen so it is in the perfect position and size, we start learning about the transparency!
The transparency is quite easy to use in the Stick creator!
But first, to open the stick creator do the following:
1.Click File
2.Click Create Figure Type
3. Now make it on full screen
To be able to see your template you need to do the following
1.Make sure it's set correctly
2.Use the key > to make it less transparent and the key < to make it more transparent
That's pretty much it
!3.Creating the "skeleton" of the figure
The skeleton of the figure is it's actually movable part, the lines that will make it smoother will not be visible and able to move
First of all you should see a line that is the very base of the stk, to make it bigger use the arrow keys (^,| )
( | V )
You should know that the more part of the body one line like this covers is better if more, here's an example:
Sorry for the bad template :/
Now pressing the letter L for simple, complete the skeleton by connecting the parts
Keep in mind that a general part of the body should be made on it's own, don't make the whole dinosaur in once.
In my case one of the general groups is it's - Body, Tail, Head of the Therizinosaurus
The end result may look something like this
Now for a bit more complicated part - The head and the mouth
So this simply can't be explained, my method of doing this is making 4 handles for the mouth, you should however make them static by pressing S on your keyboard, they will now look greyish:
In green are the parts that should be static and in blue are the ones that should be dynamic
4.Making the stick smooth (Not looking like made of balls of toilet paper)
So now you don't want it to look like made of circle lego right? Here's how to do it
First: there's a thing you should remember - In this stage always press S after making a part(Line)!!!
Now to make it look smooth you need to cover every part of the skeleton's edges with lines so it looks like the creature's actual body
Remember not to continue one line for the whole General group (the part of the stk you are making), A part of the skeleton's "flesh" should only be on it's place, don't make the detail for the tail straight to the head.
Test if it's flexible enough(No edges show up when you move the skeleton)
( Sobcrib Plox ;( )
Now for the head and mouth whic i suppose is harder for some people
Cover the dynamic handles with static lines and with this method cover the whole upper or lower jaw, do the same for the other jaw, it is preferable to make the upper jaw static, the figure won't move realisticly if you move it's upper jaw. There are exceptions ofcourse such as mosaurus or any snake i guess.
Ofc the stick I am making won't be perfect because it's an example HOW TO DO IT, NOT how to MAKE IT PERFECT
Quick note:
I wont make the tutorial on how to do the legs and arms because it's just like this
1.Add base(Skeleton)
2.Add smoothing parts(Flesh)
3.Test
This is it
, hope I helped I guess